Tuesday, March 3, 2015

MEMORY BOX WILDFLOWER CORNER DIE

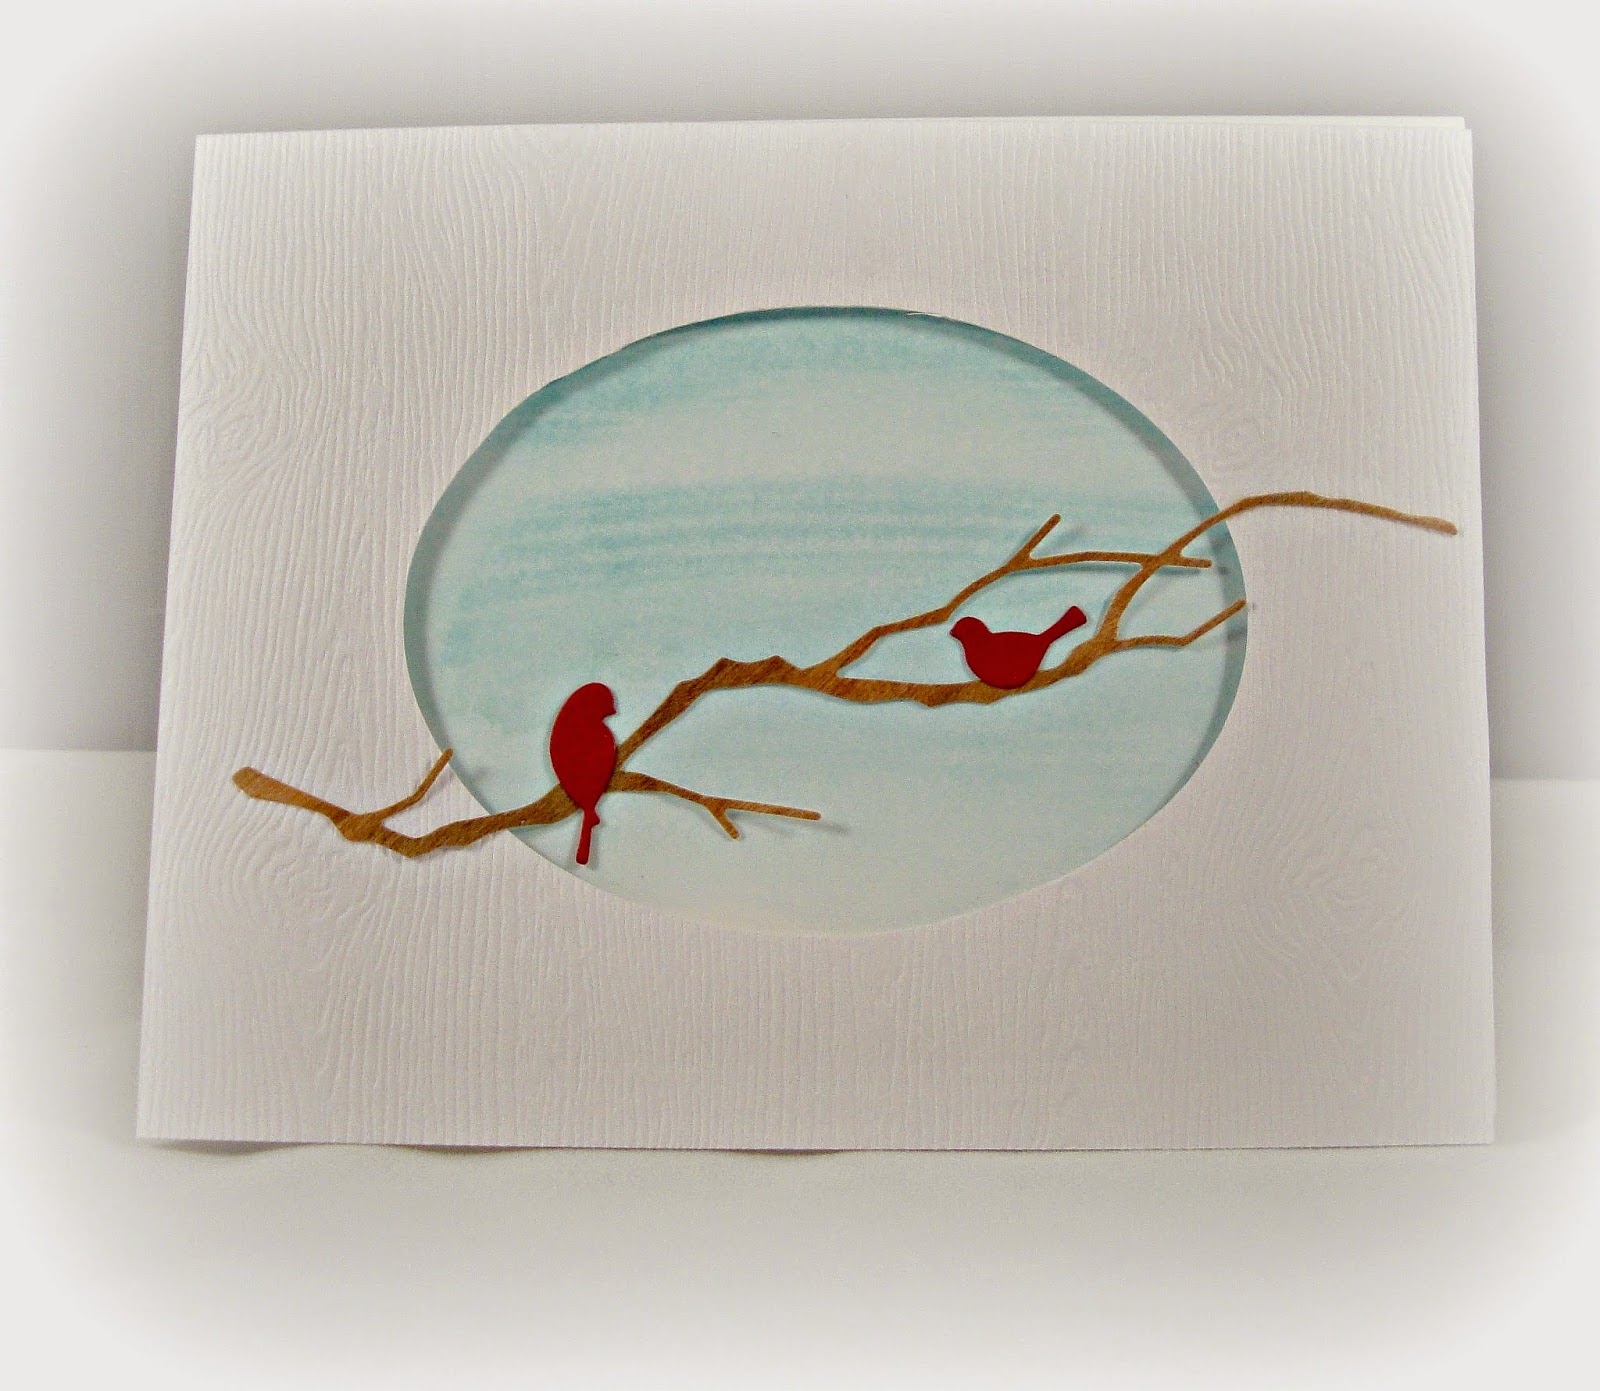
I recently received this gorgeous die by Memory Box! I've made a couple of cards using the die and different coloring methods. Here's the first card:

For this card, I used watercolor paints. First, I took a piece of watercolor paper and embossed the image on my paper by running the die through my Cuttlebug using an embossing pad. This left a beautiful impression on my watercolor paper that I could use as a guide for coloring. I colored my flowers using Distress Inks and water. Then I added a very light touch of clear Wink of Stella to give the flowers a little bit of sparkle. Once dry, I cut the die cut out of white cardstock and adhered it to my watercolor paper. The sentiment is from WPlus9's "Hand Lettered Hello" stamp set. My watercolor piece was then adhered to a slightly larger piece of kraft cardstock (to form a frame), and finally to my white A2 size card base.

And the second card:


To color this card, I used Copic markers. I cut the die cut out of white cardstock and saved the inner pieces of the flower, which I colored with Copics. The remainder of the die cut was also colored with Copics. Then I used the Memory Box "Stitched Square Layers" die (the largest size), cut it out of white cardstock, and used it as the background for my floral piece. (I really like how the floral die cut slightly overlapped the white square.) I then adhered my floral die cut to the white square die cut. This was then adhered to a coordinating color of textured cardstock, and finally to my 5" square white cardstock base. I intentionally chose not to put a sentiment on the card for 2 reasons: I'm not sure if I want to put one on there in fear it might distract from the look of the card. (I'm never bothered my white space!). Secondly, I want to leave my options open for the sentiment (if I choose to use one) so that I can match it with the appropriate occasion.

To purchase these Memory Box dies - as well as other fine dies - please visit The Fruit Of My Hands for discounted prices and excellent customer service!!

Thanks so much for looking!

Monday, February 2, 2015

NEW DIES!!

I just received some fantastic new dies and immediately started playing with them. The following 2 cards incorporate 3 new dies!! Both cards use the Memory Box/Open Studio "Time For Some Cake" die set (#30020), the Memory Box/Open Studio "Stitched Square Layers" die set (#30038) and Elizabeth Craft Designs "Stand Up Helpers" die set (#792). Here's the first card:

This card was made using patterned paper from Fancy Pants Design "Country Boutique" 6X6 paper pad (which I'm very sad to say has been discontinued). The stamped sentiments are from Hero Arts "Many Birthday Messages" stamp set. I used "Wink of Stella" in gold to accent the candle flames, and a Uni-ball Signo white gel pen to add stitches around the birthday cake.

And the second card....

I used patterned paper from My Mind's Eye "Miss Caroline - Fiddlesticks" 6x6 paper pad.

The ECD stand up helpers are such a cool little touch to keep these easel cards standing on display. To watch a great video on how to make these easel cards and use the stand up helpers, see here. For a template, check this out!

To purchase these Memory Box and Elizabeth Craft Designs dies - as well as other fine dies - be sure and visit The Fruit of My Hands for an excellent selection and discounted prices!

Saturday, January 10, 2015

100TH SCRAMBLE

Today, the Hero Arts Flickr group held their 100th 90-minute Scramble! We were to create a card using our all-time favorite Hero Arts image stamp and Hero Arts sentiment stamp. I couldn't pick just one image stamp, so I decided to try 2 together. I chose to use Hero Arts Silhouette Grass and Hero Arts Leafy Vine. I wasn't sure how the two would work together, and I was ho hum about it at first. But, the more I look at, the more it's growing on me! My sentiment was an easy choice. I chose "You Are Special" from Hero Arts Great Flourish Messages stamp set. These sentiments are so elegant! So....here's my card:
To make this A2 size card, I started with a 4"x5.25" piece of white cardstock. I inked my Leafy Vine stamp with "Bundled Sage" and Brushed Corduroy" Distress Inks, spritzed it with water and stamped it onto my cardstock. Once that was dry (I cheated and used a heat gun since I only had 90 minutes!), I inked my Silhouette Grass stamp with Versamark ink, stamped it a bit off-center, then heat embossed the image with gold embossing powder. This piece was then adhered to a 4.25"x5.5" piece of gold cardstock, then finally adhered to my white card base. For the sentiment, I inked the stamp with Versamark, and again heat embossed with gold embossing powder. This was then adhered (off-centered) to the card front with foam tape. The final touch was a few gold gems on the sentiment piece.

Wednesday, January 7, 2015

MEMORY BOX HEART DIES

I just received some new Memory Box dies that I've been so eager to create with! These dies were purchased from the wonderful web site The Fruit of My Hands. As part of the design team, I wanted to make some cards with some of the newer items sold by Memory Box. Here's the first card:
To make this card, I cut a 4"x5.25" piece of white cardstock. I colored some white embossing paste with a drop of "Broken China" Distress Ink. Temporarily adhering (I use washi tape) my piece of white cardstock to a non-stick craft sheet and adhering the Memory Box "Textured Mesh" stencil (#88517) over the cardstock and onto the craft sheet, I smeared the colored embossing paste over the stencil. Then, I carefully lifted the stencil and let the paste dry. Next, I die cut the heart shapes out of an adhesive-backed cork sheet using the Memory Box "Precious Hearts" die (#98474). They were then placed on top of my mesh pattern. The sentiment is from an old, retired, Stampin' Up! stamp. It was adhered to the card front with foam tape. Finally, this finished piece was adhered to my A2 kraft cardstock base.

Here's the second card:
For this card, I also used an A2 kraft cardstock base. I LOVE kraft cardstock! To make this card, I cut several die cuts from the Memory Box "Twirled Heart Border" die (#98279). Each cut was made with a different, but coordinating piece of patterned paper from My Mind's Eye "Dolled Up" 6X6 paper pad. I had a leftover piece of white woodgrain cardstock that I really wanted to use. So, I adhered the outline of the heart border to my woodgrain cardstock. Then, I selected random hearts from my other die cuts and glued them inside the heart border. All this was then glued to the front of my kraft cardbase. The sentiment is from Technique Tuesday's "Simply You" stamp set. For the stitching, I simply used a white gel pen. 

To purchase Memory Box and other fine quality craft dies and stencils at discounted prices, please visit The Fruit of My Hands.

Saturday, January 3, 2015

I LOVE YOU

Happy New Year!! I am privileged and blessed to be a member of the design team for The Fruit of My Hands. This is a wonderful sight that sells high quality dies stamps at reduced prices. For our first post as a Design Team, we're all creating Valentine theme cards. Here's mine:
Here's how I made it:
First, using kraft cardstock, I cut three die cuts from the Memory Box "Woodland Branch" die (#98187) and glued them on top of each other for a little bit of dimension. Next I cut the two birds out of red cardstock using Poppy Stamps "Peaceful Bird" die (#929). The white heart was cut out of white corrugated paper. I adhered the white heart to a leftover piece of kraft cardstock. The branch was placed and glued on top of the heart. For the snow, I used Flower Soft "Polar White" by running a thin line of Flower Soft glue along the top of the branches, then pressing the Flower Soft into the glue. The birds were then glued on top of the branch (with one of the bird die cuts flipped horizontally so that the birds would be facing each other). Three small red hearts were cut using this die from Simon Says Stamp. These hearts were glued randomly to the card front, then covered with "Fired Brick" Distress Stickles. When the stickled hearts were dry, I glued my focal piece to my A2 white cardstock base. The stamped sentiment is from Avery Elle's "Handwritten Notes" stamp set.

To purchase Memory Box, Poppy Stamps, and many other fine dies, please visit The Fruit of My Hands.

Thursday, October 9, 2014

HELLO

I've had this adorable Hero Arts stamp set for some time now. I've stamped several of the images, colored them, and cut them out, but then I never used them. Along came this "Hello" die by Poppy Stamps, and I though they were a perfect union! Here's one of probably several cards I'll make combining these two elements:

To make this A2 size card, I first stamped the owl image on white cardstock, colored with Copic markers and fussy cut it out. The hello bubble was then cut out of white cardstock and colored with Copic markers. Both pieces were then adhered to a 4"X5.25" piece of kraft woodgrain cardstock. That piece was then adhered to my white cardstock base.

To purchase the Poppy Stamps die and other high quality dies, please visit The Fruit of My Hands for a great selection, fantastic prices, and excellent customer service!

Thank so much for your visit!

Tuesday, October 7, 2014

HOPE YOUR DAY IS AWESOME!

Yep....one more card with the "Tall Taper Candle" die. I really had a lot of fun with this card, and used 2 Memory Box items! Here's my card:
To make this card, I cut a 4"x5.25" piece of white cardstock. Using Memory Box's "Texture Mesh" stencil temporarily affixed to my piece of cardstock, I pounced various colors of Distress Ink over the stencil to create the background. (I used Ranger's circular "Mini Ink Blending Tool"). I loved the look I got when I lifted the stencil!

For the candle, I cut the "Tall Taper Candle" out of white cardstock. The body of the candle and the flame were colored with Copic markers. I outlined the inside of the swirls with a very light gray marker. 

The sentiment was created using Simon Says Stamp's "Tilted Banner" stamps and die set. The banner was adhered to the card front with adhesive foam for some dimension.

To purchase Memory Box and other high quality dies at fantastic prices, please visit The Fruit of My Hands.

Thanks so much for visiting my blog!

Monday, October 6, 2014

HIS & HERS

I've used this same Memory Box die as in my previous post. I chose to make 2 cards, one for a male and one for a female. Here's the card for "her" (ladies first, right!?)
The patterned paper I used is from My Mind's Eye's "On the Bright Side - One" and "Fiddlesticks".  I cut the die out of a piece of paper from "On the Bright Side". The reverse side of the pieces cut from the inside of the candle were used for the body of the candle on my "guy" card (see below). All other patterned paper (the body of the candle and the dotted background) are from "Fiddlesticks". The stamped sentiment is from this stamp.

Here's the card for "him":
For this card, I cut the candle die out of white cardstock. I inserted the paper cut from the first card into the white candle outline. All patterned paper for this card is from the "On the Bright Side - One" collection. The sentiment stamp was inked with Versamark ink and heat-embossed with white embossing powder.

To purchase the "Tall Taper Candle" die and many other high quality dies, please visit The Fruit of My Hands e-store for great prices!

Thanks for the visit!

Sunday, October 5, 2014

SILVER AND GOLD

I recently purchased this brand new die from Memory Box called "Tall Taper Candle". I think this die can be so versatile and used for a number of different occasions. At the time I received it, I was starting to work on my Christmas cards, so I decided to go with a Christmas theme. All my Christmas cards will, in one way or another, incorporate what I believe is the true meaning of Christmas, which is the birth of my Lord and Savior Jesus Christ. I really wanted to try cutting a die out of foil, so I chose silver and gold. Here's my cards:
For both cards, I ran the die through my Cuttlebug on gold and silver foil. (The picture of the silver card looks almost two-toned. I think it's because the silver foil was backed with gold foil, and the gold is reflecting off the light onto the silver. Kind of a cool affect!) Then I ran the die through twice and cut 2 candles out of white cardstock. The candle pieces where then inserted into this embossing folder and embossed. After gluing the foil candle outline to my white cardstock base, I then inserted and glued the dry-embossed pieces into the candle outline.

The poinsettia was also cut out of silver and gold foil using this die. Pearls were then added to the center of the flowers.

The sentiment stamp was inked with Versamark and heat-embossed with silver and gold embossing powder.

To purchase the "Tall Taper Candle" die and many other high quality dies, please visit The Fruit of My Hands e-store.

Thanks so much for visiting!!

Saturday, October 4, 2014

IT'S YOUR BIRTHDAY!

Wow!! It's been almost 3 months since I last posted on my blog! Yikes!! I'm going to try and play catch up in the next few days!!

The following card was made as part of a 90-minute scramble on the Hero Arts Flickr site. We were celebrating the 4th year of the scramble, so the theme was to create a "celebrative" card. Here's mine:
To create this A2 size card, I used this stamp by Hero Arts. The stamps (both the balloons and the sentiment) were inked with Tuxedo Black Memento ink and stamped on to white cardstock. The balloons were colored with Copic markers. The final touch was the purple bow out of American Crafts twine.

Thanks so much for taking a peek!!

Saturday, July 12, 2014

FLOWERS & STRIPES

I recently hosted a 90-minute Scramble on the Hero Arts Flickr group. What a blast!!! My theme was flowers and stripes/plaids/checks. These were 2 of the cards I made as inspiration.

CARD #1

For this A2 size card, I used Hero Arts "Tall Flower" stamp and Hero Arts "Canvas Stripes" stamp. First I inked the flower stamp with black ink, stamped it onto white cardstock and colored it with Copic markers. Then, I fussy cut around the bottom of the flowers to use only that portion of the stamped image. I inked the canvas stripe stamp with "Faded Jeans" distress ink and stamped onto a 4x5.25" piece of white cardstock which was then adhered to my white card base. The flowers were adhered to the card front with foam adhesive. The "Absolutely" and "Amazing" are from this die/stamp set from Simon Says Stamp. The blue strip behind "Absolutely" was made by swiping my "Faded Jeans" Distress Ink pad across white cardstock so that it would coordinate with my canvas stripes. The "Amazing" sentiment was also inked with "Faded Jeans" Distress ink.

CARD #2

For this card I used Hero Arts "Large Line Flowers" stamp and Hero Arts "Tweed Pattern" stencil. I cut a piece of kraft cardstock to 4x5.25". I used white embossing paste to stencil a portion of the tweed pattern onto the left hand side of my card. The flowers were made by inking my stamp with Versamark ink, stamping onto vellum, and heat embossed with white embossing powder. Then I fussy cut out 3 of the flowers. The stenciled kraft piece was adhered to my white cardstock base. The flowers were then added along the right side of the card, and finally embellished with gems in the flower centers.

MORE FROM MY "PRIZE" STAMP

So....when I started playing with this stamp, I stamped the image several times on gray cardstock to use as a background on my cards. Then, I experimented with fussy cutting the flower image, combining with patterned paper, and other elements. Here's a couple more cards I came up with:


CARD #1
Other than my gray background, there was no other stamping on this card - just a combination of patterned paper from My Mind's Eye Miss Caroline "Fiddlesticks". I LOVE this paper!! The decorative brad at the bottom right of the card is from the coordinating Fiddlesticks "Lucky" brad set.

CARD #2
This card is also using some patterned paper from the "Fiddlestick" paper pad. For this card, along with my gray background, I also stamped the flower image on white cardstock and heat embossed it with clear embossing powder. The flower was colored with Distress Inks (misted with water). The colors used were: "Victorian Velvet", "Worn Lipstick", "Aged Mahogany" and "Peeled Paint"

TIME TO CELEBRATE

I'm beginning to really love the combination of florals and stripes. This A2 size card was super easy to put together because of this wonderful patterned paper!! A piece of this 6x6" patterned paper was trimmed to 4.25x5.5" to use as the background of my card. This butterfly stamp was inked with Versamark, stamped on 2 different coordinating pieces of patterned paper (all from the same paper pad) and heat embossed with black embossing powder. I cut out the butterfly, then cut out just a portion of the second stamped butterfly image for the yellowish portions in the middle of the butterfly. The center of the butterfly was colored in with a black sharpie. This was attached to my card front with foam adhesive and the butterfly attennas were drawn with a black sharpie. The sentiment stamp was inked with Versamark and heat embossed with white embossing powder. (I actually overheated my embossing which is why theres a slight yellow hue to my sentiment.) :(  Three adhesive pearls were added as the finishing touch.

Thanks for stopping by!!

Wednesday, July 9, 2014

YOU MAKE ME SMILE

To make this A2 size card, I inked this flower stamp with black ink, stamped onto white cardstock, colored the image with Copic markers, and fussy cut the image. The denim patterned paper is from My Mind's Eye "On The Bright Side - One". This piece of paper was trimmed to 4x5.25". This sentiment stamp was inked with Versamark ink, stamped onto my denim background, and heat embossed with white embossing powder. Twine was wrapped around the bottom portion of the paper. Then the denim piece was adhered to my white cardstock base. The flower was attached to the front of the card with foam adhesive.

Thank for looking! Come back any time!!

Sunday, July 6, 2014

MY "PRIZE" STAMP

The stamp used on the card I made here (Hero Arts CG403) was in a prize package I received in the last 90-minute scramble hosted on the Hero Arts Flickr site.This stamp creates such a beautiful background for a card. The individual flowers can be cut out and used by themselves too. Here's my card:

To make this A2 size card, I inked the stamp with white ink and stamped onto a piece of gray cardstock trimmed to 4x5.25". After cleaning off the stamp, I inked it with Versamark ink, stamped it on white cardstock and heat embossed it with clear embossing powder. I then colored it with "Milled Lavender", "Shaded Lilac" and "Dusty Concord" distress inks. (I pressed the stamp pad on my nonstick craft sheet & misted it with water to create my "watercolors".) I used "Mowed Lawn" for the leaves. Then, the flower image was cut out. The flower was attached to the gray background with foam adhesive. I wrapped a piece of white satin ribbon, then silver ribbon along the left-hand side of the gray base. All this was then attached to my white cardstock base, and gems were added for the finishing touch.

Thanks so much to Laura Norris for the beautiful stamp!!

Thursday, July 3, 2014

MEMORY BOX BUTTERFLY ARCH

I recently received these brand new dies from Memory Box: "Delicate Butterfly Arch" (#98982) and "Solid Arch Background" (#98992). Here's 3 different cards I made with them:

Card #1
For this card, I cut 2 of the "Delicate Butterfly Arch" and joined them together. Then I cut 2 of the "Pippi" Butterflies and applied glitter to them. The Pippi Butterfly is the same shape and size as the main butterfly on the "Butterfly Arch", but the details are slightly different. However, you have to really look closely to tell the difference! These were adhered to a kraft background and then to my white A2 card base. Then I added some blue gems to the center of some of the flowers.

Card #2
I cut the butterfly arches for this card out of thin wood paper. I love the richness of the darker wood behind the lighter. These were adhered to my white A2 card base. Then I added the sentiment and some gold metallic dots for accent.

Card #3
For this card, I cut the "Delicate Butterfly Arch" out of kraft cardstock. I also cut out an extra butterfly. The solid arch was cut from a piece of patterned paper from the Fancy Pants "Country Boutique" 6X6 paper pad. The main background of the card was also cut from coordinating patterned paper from the same pad. The sentiment stamped was inked with Versamark ink, stamped on kraft cardstock, and heat embossed with white embossing powder. The final touches were the placement of the extra butterfly and gold metallic gems.

To purchase the Memory Box dies used here, as well as other high quality craft items, please visit 
www.thefruitofmyhands.com  
for excellent prices and top-notch customer service!

Tuesday, July 1, 2014

HAPPY BIRTHDAY TO YOU!

I participated in another 90-minute Scramble with the Hero Arts Flickr Group. I love the challenge of creating, photographing and posting a card based on the hostess' theme...and all within 90 minutes. It's always so much fun!! Here's my card:
To make this A2 size card, I stenciled the star onto a 4x5.25" piece if white cardstock. I made the stencil using my Silhouette Cameo. The stencil was sponged with "Squeezed Lemonade" and "Mustard Seed" Distress Inks. My "Polka Dot Person" stamp was inked with Hero Arts "Soft Stone" Shadow Ink, stamped onto white cardstock, cut out, and adhered to my white panel with dimensional foam adhesive. The stamp used for the sentiment was Hero Arts "Calico Border". I inked the stamp with Versamark, stamped onto a yellow strip of cardstock, and heat embossed it with white embossing powder. I adhered my white panel (with the stenciled star and polka dot woman) onto a 4.25x5.5" piece of yellow cardstock, then onto my white cardstock base. The sentiment strip was adhered along the side of the card. Gems were added randomly for the finished touch.

Thanks so much for taking a look! I hope you come back again!

Tuesday, May 27, 2014

BUTTERFLY FLUTTER

This card incorporates the Memory Box Butterfly stencil set, which includes "Butterfly Flutter" (#88560) and "Butterfly Delicate Butterflies" (#88561):
To make this card, I stenciled the "Butterfly Flutter" stencil onto a piece of 4x5.25" white cardstock. I used Distress Inks in "Peeled Paint", "Peacock Feathers", "Salty Ocean" and "Mustard Seed". For the detail of the butterflies, I inserted the "Butterfly Delicate Butterflies" stencil inside the "Butterfly Flutter" stencil so that I knew where my detail would be. I then used the same colors of Distress Inks which darkened the main part of the butterfly and made the details look lighter. For a few of the circles, I colored the inside with "Spiced Marmalade" Distress Ink. Then, I distressed the edges of this white piece with "Salty Ocean" Distress Ink and adhered it to a bright yellow 4.25x5.5" piece of cardstock. This was then glued to my white cardbase. The sentiment banner was made using Simon Says Stamp's "Tilted Banner Sayings" and coordinating die. For the final touch, I added some coordinating gems.

To purchase the Memory Box stencils used here, as well as other high quality craft items, please visit www.thefruitofmyhands.com  for excellent prices and top-notch customer service!

BIRDS ON A BRANCH

I was playing with a couple more Memory Box dies and came up with this card:
For this A2 card, I die cut the branch out of wood veneer paper using the Memory Box "Woodland Branch" die (#98187). The birds were cut out of red cardstock using the Memory Box "Resting Birds" die (#98527). To assemble the card, I "washed" the front of my card with a watercolor wash using Distress Inks to make it look like the sky. I cut an oval out of the center of a 4.25X5.5" piece of white woodgrain paper and attached it to the front of the card with foam tape. Then, the branch and birds were adhered to the card front. A simple sentiment could easily be added to the card (I'd put it in the bottom right corner), or the card can be left plain.

To purchase the Memory Box dies used here, as well as other high quality craft items, please visit www.thefruitofmyhands.com  for excellent prices and top-notch customer service!

Wednesday, May 21, 2014

WATERCOLOR CARD....AGAIN!

This card uses the same stamp as in my previous watercolor cards. I had forgotten that I had pre-stamped the image on a piece of watercolor paper and it was just SHOUTING to be colored in! So here's another card:
I have to say that I really, really like this one. I was a bit more patient with the drying and was able to accomplish a deeper intensity in the color of the center of the flower. I had made too many smudges on the watercolor paper, so I cut out the image, leaving a small white border. This was then glued onto a 4.25"x5.5" piece of white woodgrain paper and adhered to my A2 size card base. The sentiment (Hero Arts #CL173) was inked with Tuxedo Black Memento ink.

Thanks for looking!!