Monday, January 30, 2012

Lily Pad Cards' Patterned Paper Challenge #3

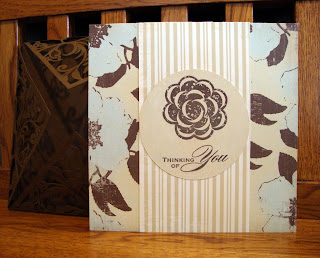
Card #3 also incorporates the use of the Silhouette Cameo! I originally saw the Silhouette die used for this card on Kristina Werner's blog. You can see her card here. It's called a "card wrap". Here's my card:
The Silhouette die (cut on a 12X12" piece of brown cardstock)actually cuts a heart to use to close the flaps in the center. However, you could use whatever shape you want. I've left my "closure" piece off until I'm ready to send the card. I'll be needing to remove the insert so that I can write a note on it.


Here's the inside of the card (showing the card insert) with the flaps open:
This is the insert removed from the "card wrap":
The insert is a sheet of double-sided patterned paper cut down to fit nicely inside the card wrap. The card wrap measures approximately 6x6". I cut a strip of coordinating paper for the middle of the card to break the busyness of the pattern up. The flower and sentiment were then stamped on a third piece of coordinating paper that had more of a solid background. Since the card insert is just a flat piece of paper (kind of like a postcard), I decided to add the same strip of paper down the back side of the insert which will allow me to write a note when the time comes! 


Here's the back of the card insert:
Here's the supplies:


Thanks for visiting!!

Lily Pad Cards' Patterned Paper Challenge #2

Here's card #2 using patterned paper. This card was inspired by a technique taught on the recent Online Card Class. Here's my card:
Here's the inside:
Closeup of the flower:
And, here's how I did it:
I recently purchased a Silhouette Cameo Die Cutting Machine and WOW, am I having fun with it!!  This particular shape happened to be a "Free Shape of the Week" and I couldn't resist trying it! The shape is called "3D Fanned Flower" The shape is originally sized for a 12X12" piece of paper, but I sized it down to fit on a 6X6". I then cut the die using a double-sided piece of patterned paper. Once I knew the finished size of the flower, I cut a circle - slightly larger than the flower - on the front of the card. Instead of using twine or ribbon, I decided to cut skinny strips of the same patterned paper and glue them to the front of the card.

The flower was then glued to the INSIDE of the card so that it would "peek" through the circle. I originally used Dimensional Pearls for the inside of the flower, but didn't really liked the way it looked. So, I just stuck a big white pearl in the center! A stem and leaves were cut from the same paper and glued under the flower.  Then, the sentiment was stamped with Versamark and heat embossed with white embossing powder.

I also debated on whether or not to stamp or add something else to the front. But, the more I looked at it, the more I liked the simplicity of it. Then, the inside of the card becomes the "highlight".

Here's the supplies:


Thanks so much for taking the time to check it out!

Lily Pad Cards' Patterned Paper Challenge #1

When I saw Lily Pad Cards' Patterned Paper Challenge (sponsored by Simon Says Stamp), I knew I had to get some cards made. Yes, I'm one of those that LOVES to buy patterned paper.....and then let it sit on the shelf!  Actually, one of the easiest and quickest way to make cards is to use patterned paper.  Anyway, here's my first card:
Here'a how I did it:
I stamped the butterfly twice on 2 different (but coordinating) sheets of 6X6" patterned paper. I then cut out one of each using the whole stamp, then one of each using just the inner sections. The inner section of one butterfly was then adhered over the inner section of the other butterfly for the contrast on the wings.  I then cut assorted shapes of the leftover cardstock and a couple strips of one other coordinating sheet of cardstock and adhered them all to an A2 base card of kraft cardstock. The butterflies were adhered with 3D foam stickers to give them some dimension. This was a VERY simple card!

Here's the supplies:


Thanks for looking!!

Saturday, January 21, 2012

Flower Soft

I recently discovered a new and REALLY cool embellishment called "Flower Soft". It's been around for a while, but it's new to me.  It adds almost a "realistic" dimension to images.  I had received this stamp from a friend and for a while, I was struggling with how to use it creatively. When I saw "Flower Soft", I thought I'd give it a try with this stamp. Here's the card:
Here's how I did it:


I stamped with image with black ink onto white cardstock and colored it with Copic Markers. Then the image was cut out. I applied Glossy Accents to the bottles to give it the shine and let it dry. One the Glossy Accents was dry, I applied Flower Soft to the flowers. I actually had to create my own colors of Flower Soft, because I have a very limited supply.  It was very easy to do though. I just put a little bit of Ivory Flower Soft into a ziplock bag, added some alcohol ink and "rubbed it in" to get the colors I wanted.


The background is embossed white cardstock.  I colored it with Antique Linen Distress Ink, but it ended up being a little more color than I wanted. So I "whitewashed" it with Picket Fence Distress Stain. The stamped image was adhered to the background with 3D foam squares for added dimension. Then, it was all adhered to black cardstock. I really love the look of the Flower Soft!!!


Supplies:


Thanks for looking!!!

Butterfly Garden on Black

I've been participating in the Clean and Simple Online Card Class. This technique was one that was featured as part of the class.  It consists of stamping an image with white ink onto black cardstock, then coloring with colored pencils. I love the look of it!! Looks kind of like a chalkboard with BRIGHT chalk!  This was a lot of fun and I look forward to trying this technique with other stamps.

Here's the supplies:


Thanks so much for stopping by!